Linux namespace in Go - Part 2, UID and Mount
In the previous article, I did two experiments on what isolation it brings with PID and UTS, this article explains UID and Mount namespace.
The series of Linux namespace in Go:
- Linux namespace in Go - Part 1, UTS and PID
- Linux namespace in Go - Part 2, UID and Mount
- Linux namespace in Go - Part 3, Cgroups resource limit
UID namespace
As Linux man page described,
User namespaces isolate security-related identifiers and attributes,
in particular, user IDs and group IDs (see credentials(7)), the root directory, keys (see keyrings(7)), and capabilities (see capabilities(7)). A process’s user and group IDs can be different inside and outside a user namespace. In particular, a process can have a normal unprivileged user ID outside a user namespace while at the same time having a user ID of 0 inside the namespace; in other words, the process has full privileges for operations inside the user namespace, but is unprivileged for operations outside the namespace.
The key point is that the unprivileged user outside the namespace can be mapped to the root-user inside the new namespace by creating a UID namespace with UID mappings.
Let’s take an example, on my Ubuntu I want to create a user namespace and use non-root user to run the process, as tested in my previous article, I can’t run the Go program without root permission. But with user namespace, I can map non-root user, in this case,
1 | id |
to the root user in the container,
1 | package main |
UidMappings implements the user mapping between host and container, it will map the user id in the host to the user id in the container, the size parameter indicates it’s a contiguous range mapping. If size is 10 and containerID is 0, HostID is 1000, it means 1000-1010 will be mapped to 0-10.
GidMappings is the same mechanism as UidMappings, it represents Group id.
Now, we’re root in the container but non-root in the host, how does the permission look like in the container?
1 | (container) # id |
You can find out that although I’m the root user in the container, I still don’t have the permission to
create a file under root directory, because to the host, I’m actually a non-root user srjiang, I can only manipulate the files that srjiang can. If I run the golang program with sudo, I can operate on the root directory as I wish.
What about ps -ef?
Remember in the previous article, I left a question how to list the processes only visible within this namespace, here comes the answer: mount a new /proc.
The proc filesystem is a pseudo-filesystem which provides an interface to kernel data structures. It is commonly mounted at /proc.
As name explained, the process information is stored under /proc folder, most of the files in the proc filesystem are read-only, they’re dynamic and stored in memory.
By default, everybody may access all /proc/[pid] directories, besides process information you can also update the process configuration.
To isolate the container’s process list from the host, we need to mount a new /proc directory instead of sharing the host’s /proc, we can implement this by
1 | (container) # mount -t proc proc /proc |
After mounting the /proc,
1 | (container) # ps -ef |
You’ll only see the processes within the container.
One step forward
For now, we have our own /proc directory that supports standalone process information, but we still share other filesystem with the host, if we want to have a totally fresh filesystem, we need to prepare a new root filesystem and replace the default root filesystem with the new one.
Download the alpine root filesystem
Alpine OS is popular and secure, tiny OS, I choose it as this experiment’s OS, the files (mini root filesystem) can be downloaded from https://alpinelinux.org/downloads/, after that we need to consider how to let the process use this root filesystem, we’ll pivot_root here to change the root filesystem.
pivot_root takes two main parameters, the first one is new_root which is where your new root filesystem is, in this case, ~/Downloads/alpine_root/; the second one put_old which is the location you want to put your current root filesystem.
1 | (container) # mount -B ~/Downloads/alpine_root/ ~/Downloads/alpine_root/ |
The reader might be asking “why do we need to mount the new root filesystem again?”, read the pivot_root man page, you will see new_root must be a path to a mount point, but can’t be “/“, so mounting itself ensures it’s a mount point.
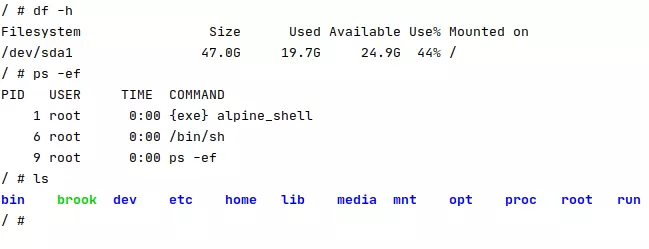
After you run the commands in the container, you have set the alpine root filesystem now.
What about old_root?
We almost forget old_root, it’s the previous root filesystem, we don’t want to see it in the container, so let’s umount it.
1 | (container) # umount /old_root |
Who’s using old_root now? I remember, the shell we use now is still under /old_root, we need to use alpine’s shell, so, the final workflow of the program is:
- mount alpine root filesystem
- mount /proc
- use pivot_root to use alpine
- chdir to the root directory
- umount the old root filesystem
- run the alpine’s shell (or whatever you like)
For the Golang implementation, it’s here: https://github.com/songrgg/namespace-demo#mount-a-new-root-filesystem
What’s Next?
Until now, we have setup an Alpine container that has separate UTS, UID, PID namespaces, we’ll create the networking namespace in the next experiment.
Also, in the future we can test how to limit the container resource.
Reference
Linux Manual - proc
Linux /proc explained
Pivot_root
Pivot_root2
